
Sales Tax Guide for Amazon FBA Sellers
- Platform
- Amazon
- Versions
- FBA & Non-FBA
- TaxJar Product Page
- Visit
- Last Updated
- June 14, 2016
Amazon FBA sellers are in a unique position when it comes to collecting and remitting sales tax. To a beginning seller, this position can be overwhelming. But never fear!
TaxJar put together this guide to help you understand the basics of sales tax, and walk you through, step-by-step, setting up sales tax collection through your Amazon FBA seller account.
We’ll walk you through:
- The basics of sales tax
- How to determine your sales tax nexus
- How to apply for a sales tax permit
- How to determine how much sales tax to collect from buyers
- How to set up your Amazon Seller Central account to automatically collect sales tax
- How to automate the whole process and file your sales tax returns with TaxJar!
- By the time you finish reading this guide, you will feel confident that you are collecting the correct amount of sales tax from the right customers in the right states, and empowered to continue to grow your FBA business!
Sales Tax 101 for Amazon Sellers
We talk to a lot of Fulfillment by Amazon sellers while building and improving TaxJar. And one thing we hear time and time again is that FBA businesses go through a very similar learning curve.
A seller will often comes to FBA after having dabbled in online sales in other platforms, like reselling old items around the house or thrifting finds on eBay. Soon, they realize how fun and lucrative selling online can be and the business starts to grow.
But that’s when sellers start running into the “business” side of eCommerce business. That means bookkeeping, self-employment taxes and the most ubiquitous administrative hassle of them all: sales tax.
If this sounds familiar, then this quick guide is for you. The goal is to explain the basics of sales tax for new eCommerce sellers (or seasoned eCommerce sellers who have questions.)
Let’s get started:
The Basics of Sales Tax
Forty-five U.S. states and D.C. levy a sales tax. Merchants in these states are required to charge sales tax to buyers.
Sales tax is considered a “pass-through” tax, because the merchant is only holding the taxes collected before remitting it to state and local taxing authorities at a set time (usually either monthly, quarterly or annually.)
Sales tax is used to fund state projects and initiatives, including schools, roads, public safety departments, etc.
In the U.S., states have quite a bit of leeway with sales tax administration. Because of this, all 45 states (plus D.C.) that levy a sales tax have different rules and laws when it comes to sales tax. Sales tax rates can vary by state and locality, too.
One example of how state sales tax rules vary is that some states require you to charge sales tax on shipping charges, while others do not. Another example: some states might require you to renew your sales tax permit periodically, while others do not.
Even more confusing - some local areas may levy sales tax even in states with no statewide sales tax (such as in Alaska.)
It’s important to get in touch with your state’s taxing authority or an experienced accounting professional should you have questions about sales tax. Here’s a map with plenty of info about how to contact each state’s taxing authority.
Determining Sales Tax Nexus
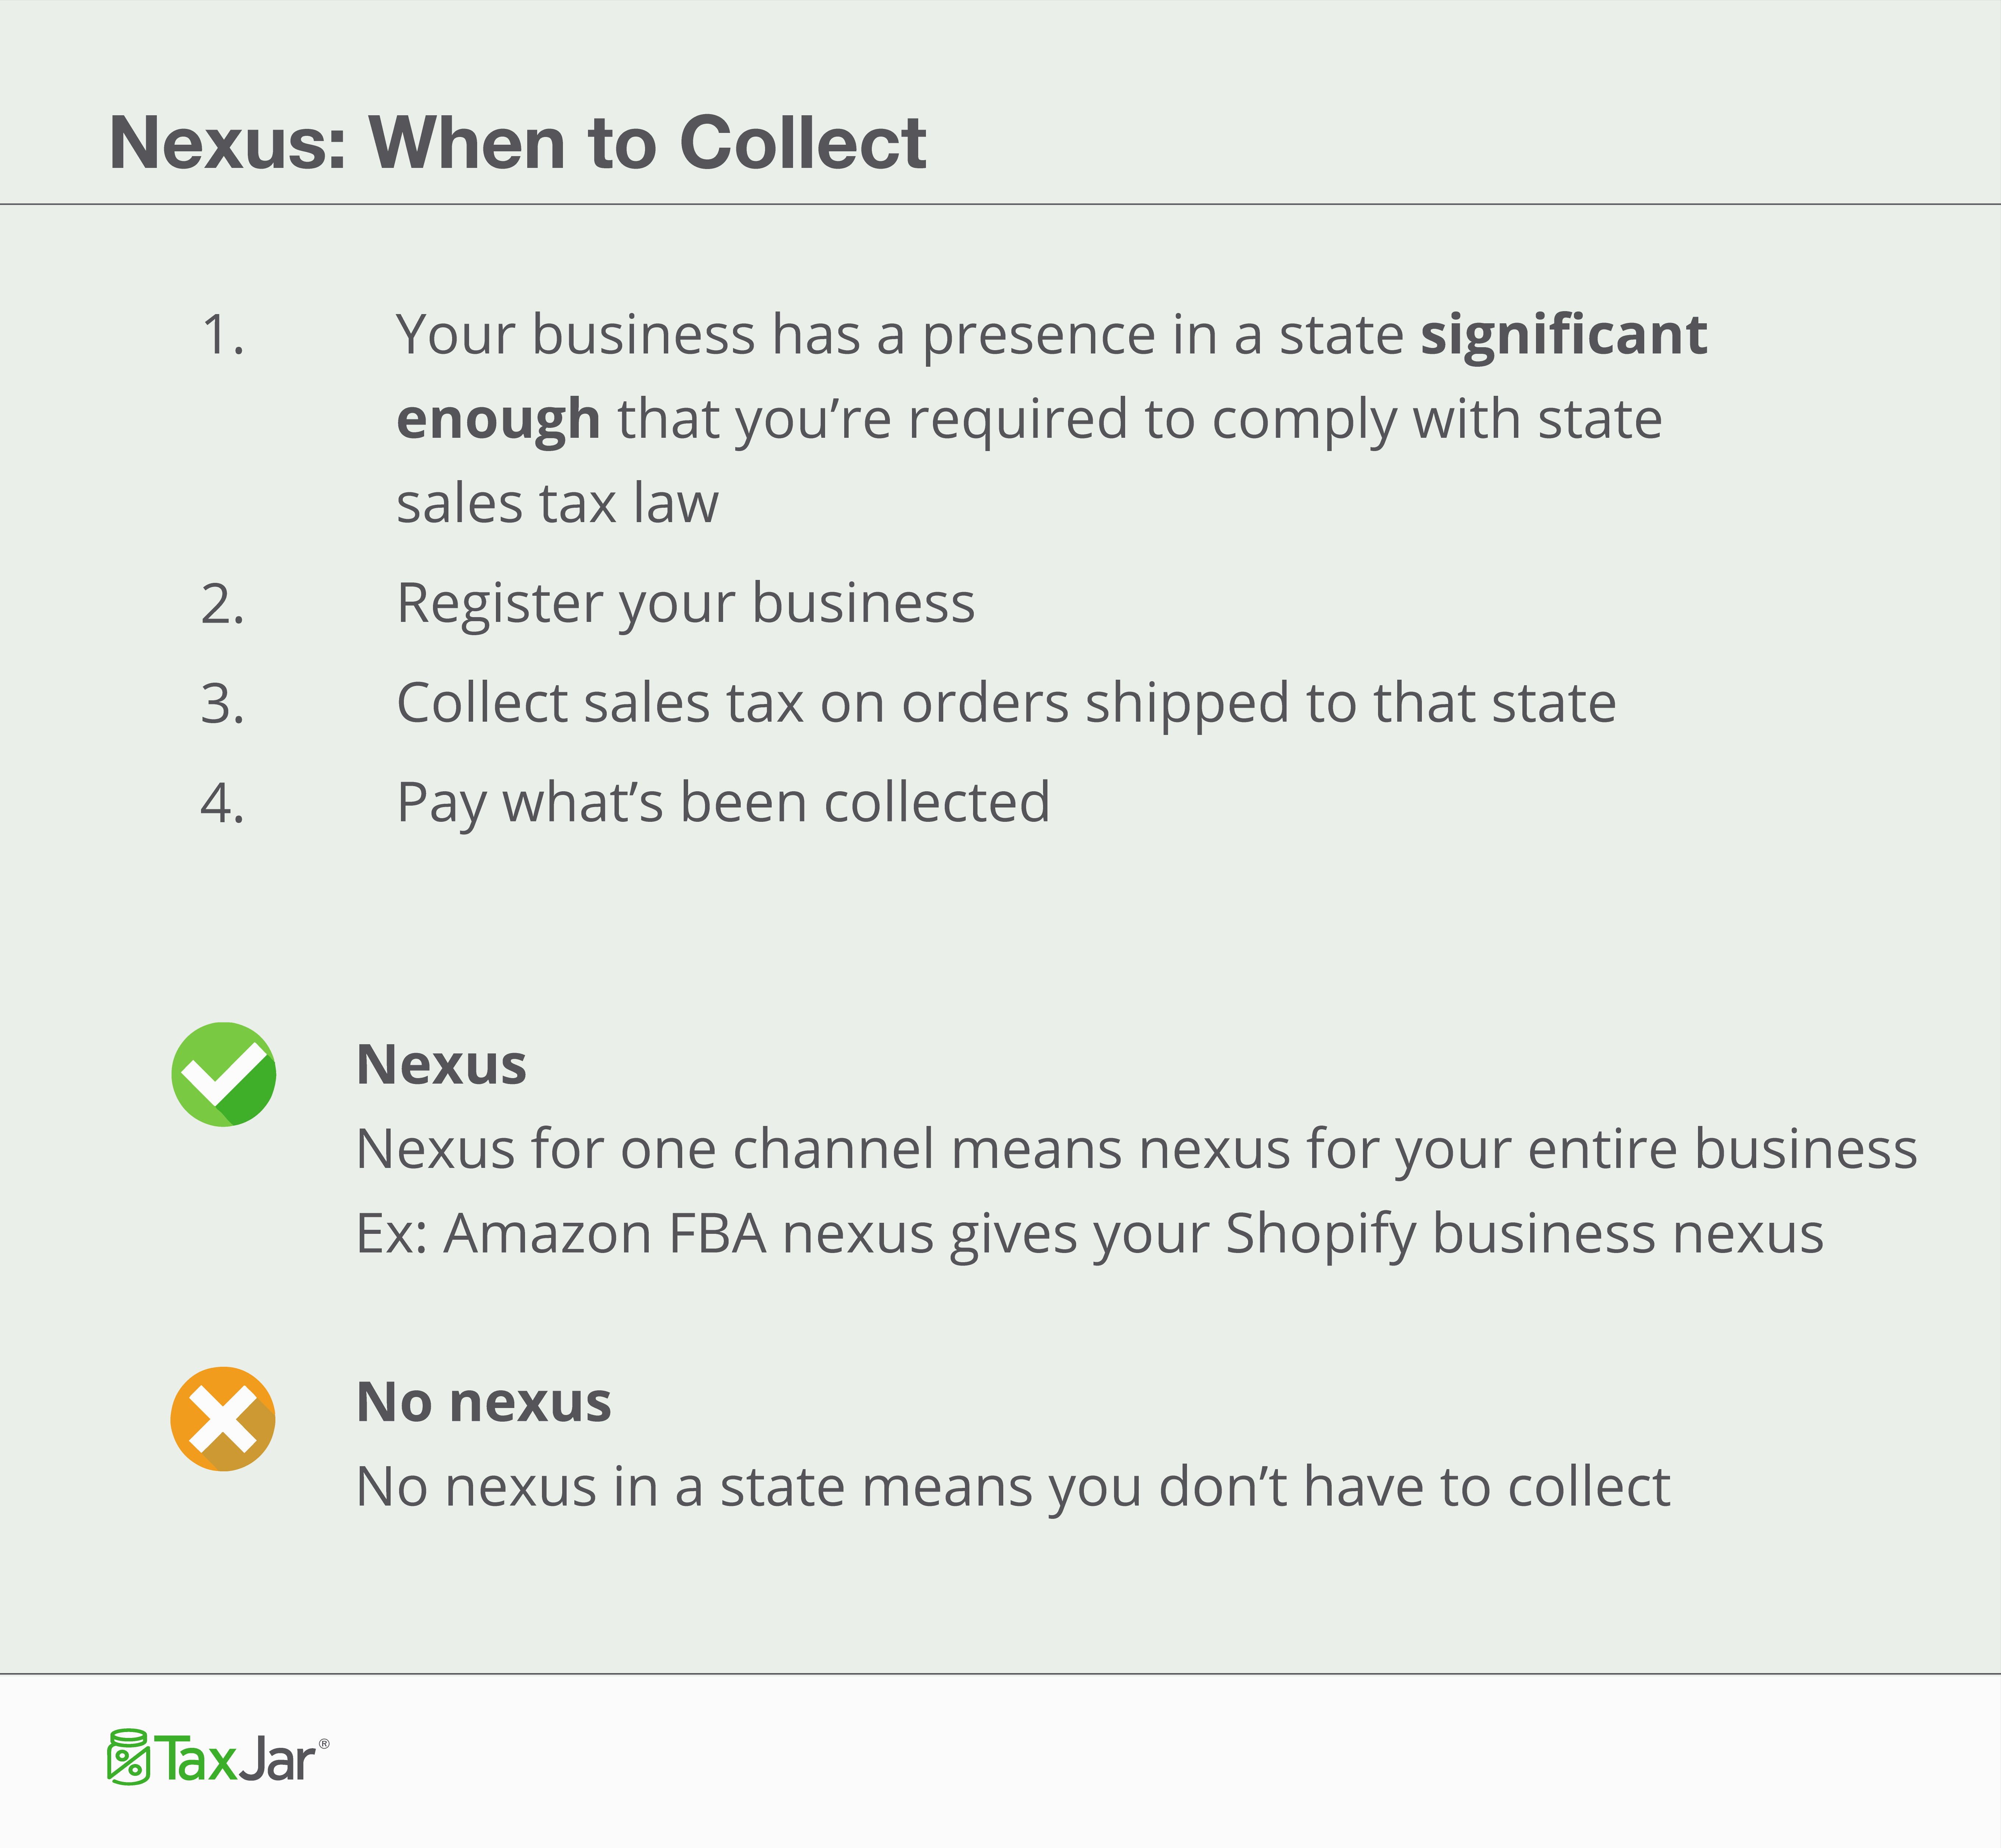
Online sellers must collect sales tax in states or localities where they have “sales tax nexus.”
While all states have a slightly different definition of this term, sales tax nexus is generally defined as “presence” in a state. This presence must be significant enough so that a business has to comply with the state’s sales tax law
Presence can include – but is not limited to – economic activity.
If you have sales tax nexus in a state that requires sales tax collection, then you’re required to collect sales tax from all buyers in that state regardless of where the item is shipped from.
If you do not have sales tax nexus in a state, then you’re not required to collect sales tax when you sell online to buyers in that state (regardless from where the item is shipped).

1. Home state nexus – You live and run your eCommerce business in Texas. Because you have a physical presence in Texas, you have “sales tax nexus” there, and therefore are required to collect sales tax from buyers in the state of Texas.
2. Employee nexus – You live and run your eCommerce business in the state of Florida, but you hire your sister in Georgia to help you. Because you operate out of Florida and have an employee in Georgia, you now have sales tax nexus in Florida and Georgia and must collect sales tax from buyers in both states.
3. Economic nexus - “Economic nexus” is when a seller is required to collect sales tax in a state because they make either a certain dollar amount of sales in that state or have a certain number of sales transactions in that state. The most common economic nexus threshold in a state is $100,000 in sales or 200 transactions in a year. Economic nexus is a fairly new concept, and only about half the U.S. states with sales tax have economic nexus laws, though more states are adding new economic nexus laws and regulations. You can read about each state’s economic nexus laws here. And you can find out where your business has economic nexus by using TaxJar’s Sales & Transactions Checker.
4. Inventory nexus – Most states have ruled – either definitively or vaguely – that 3rd party fulfillment constitutes nexus. This means that if you store your inventory in a warehouse in a state, then that constitutes sales tax nexus. So if you live in Wisconsin, but store your inventory in California for the purposes of faster shipping, then you have sales tax nexus in both states. TaxJar helps you determine where you have nexus due to Amazon FBA Inventory. Look for the brown Amazon badge on your TaxJar dashboard.
Example #4 can be especially cumbersome for 3rd party sellers, whose inventory may be stored in states other than their home state. Third-party selling, and the associated sales tax registration and filings required, can create a huge administrative burden on unsuspecting eCommerce merchants.
Where Does FBA Give You Sales Tax Nexus?
Find out where selling on FBA gives you sales tax nexus by simply logging into your TaxJar account. All you need to do is be sure you’ve connected your Amazon Seller Central account to TaxJar.
From there, go to Account > State Settings. You’ll see a brown Amazon badge next to the Amazon warehouse states from where your inventory has shipped.
If you’re not a current TaxJar customer, it’s easy to set up a 30-day free trial (no credit card required).
Once you’ve authenticated your Amazon account we’ll show you where you’re Amazon inventory is shipping from.
1. Obtain a sales tax permit (sometimes called sales tax license) for that state (in the cases of third-party sellers this means acquire a license in every state where you warehouse inventory)
2. Begin collecting sales tax in that state (most states consider it illegal to collect sales tax without a permit)
Collecting Sales Tax from Buyers
Every eCommerce business owner wants their business to grow and thrive. Growth can’t be achieved if you have to manually calculate how much sales tax to collect every time you make a sale. That’s why most online sales marketplaces will include a sales tax component. On Amazon, once you set up your settings within your seller central account, they will begin collecting sales tax on your behalf. However, collecting the sales tax is only the first step. Determining how much you owe to multiple states with multiple rates can be a very time consuming process. This is why we built TaxJar to better support Amazon sellers. More to that in part 2.
A note on sales tax rates: States set a rate, and then localities can add a percentage on top of those rates. For example, in the 90210 zip code, the tax rate is the 6.5% California statewide rate, a 1% Los Angeles County rate, and an additional 1.5% local rate, for a total of 9.0% sales tax rate.
Why did we have to put these guides together? Because, unfortunately, collecting sales tax via various online platforms is rarely simple. This is especially true if you collect sales tax at multiple rates, such as is the case for sellers in destination-based states. This is why TaxJar for Amazon sellers is so useful. To find out how, keep reading.
Origin-Based Sales Tax States and Destination-Based Sales Tax States
When it comes to determining tax rates, most states fall into one of two major buckets when it comes to sellers with home state nexus: “origin-based” sales tax states and “destination-based” sales tax states.
In layperson’s terms, this means that some states require you to collect sales tax at the rate effective at the point of “origin” (i.e. your office or warehouse) while most states require you to collect sales tax at the rate of the “destination” (your buyer’s address.)
Origin vs. Destination-Based Sales Tax Examples
Let’s say you live in (or have a warehouse or office in) Irving, Texas, but sell to someone in Archer City. Texas is an origin-based sales tax state, so you would charge any buyer in the state of Texas your home rate of 8.25%. (That’s Texas’s statewide 6.25% rate plus Irving County’s 1.0% plus a local Dallas MTA rate of 1.00%.) You don’t need to take your buyer’s address in Archer City into account.

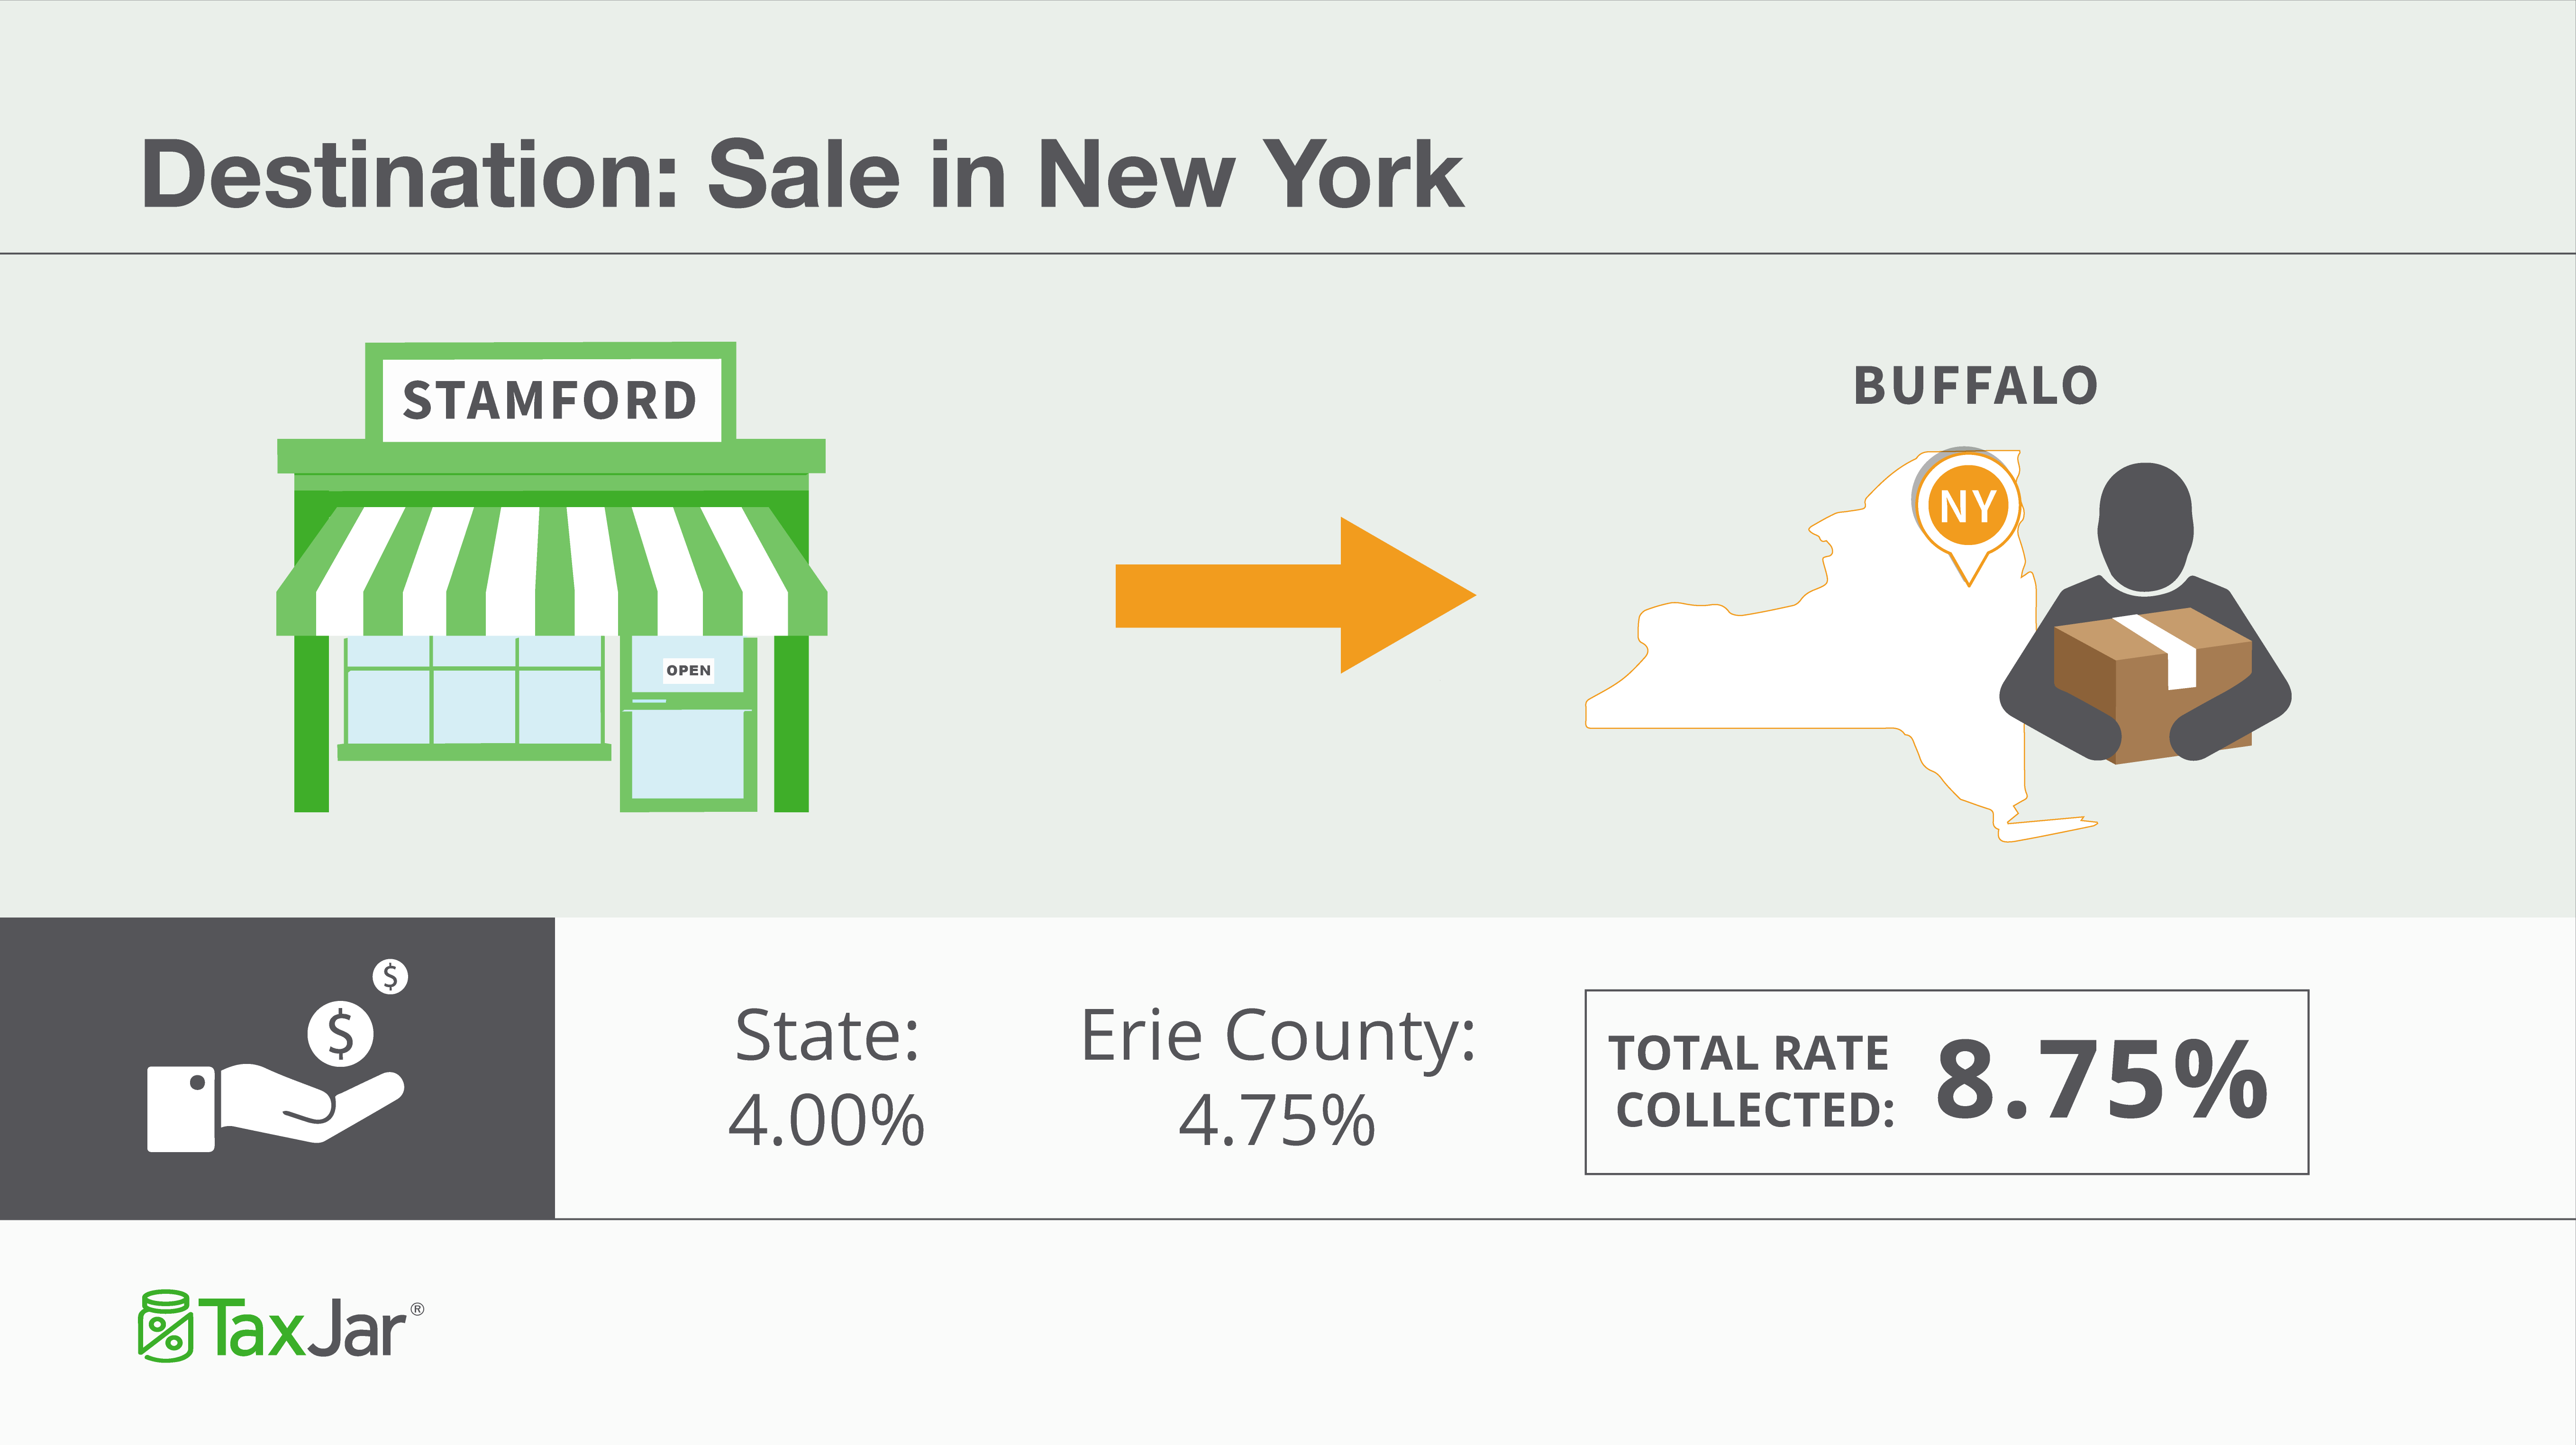
But if you live in Stamford, New York the rules are different. Since New York is a destination-based sales tax state, you’re required to collect sales tax at the effective rate at your buyer’s address. So if you operate your business in Stamford and sell to a buyer in Buffalo, then you are required to charge the seller 8.75% sales tax – the total sales tax rate at their locality in Buffalo. (That’s a New York state base rate of 4.0% plus the Erie County rate of 4.75%).
For more information, see this map of Origin vs. Destination Sales Tax Collection in the United States.
We know that some online sellers also sell offline at brick and mortar stores, trade shows, craft fairs, etc. If you find yourself in a situation where you need to lookup a local sales tax rate, check out TaxJar’s Sales Tax Calculator as a quick reference.
Once you have determined your sales tax rate and collected sales tax from buyers, you then have to remit the funds you collected to your state(s). (Remember, sale tax is a passthrough tax and you don’t get to keep it!)
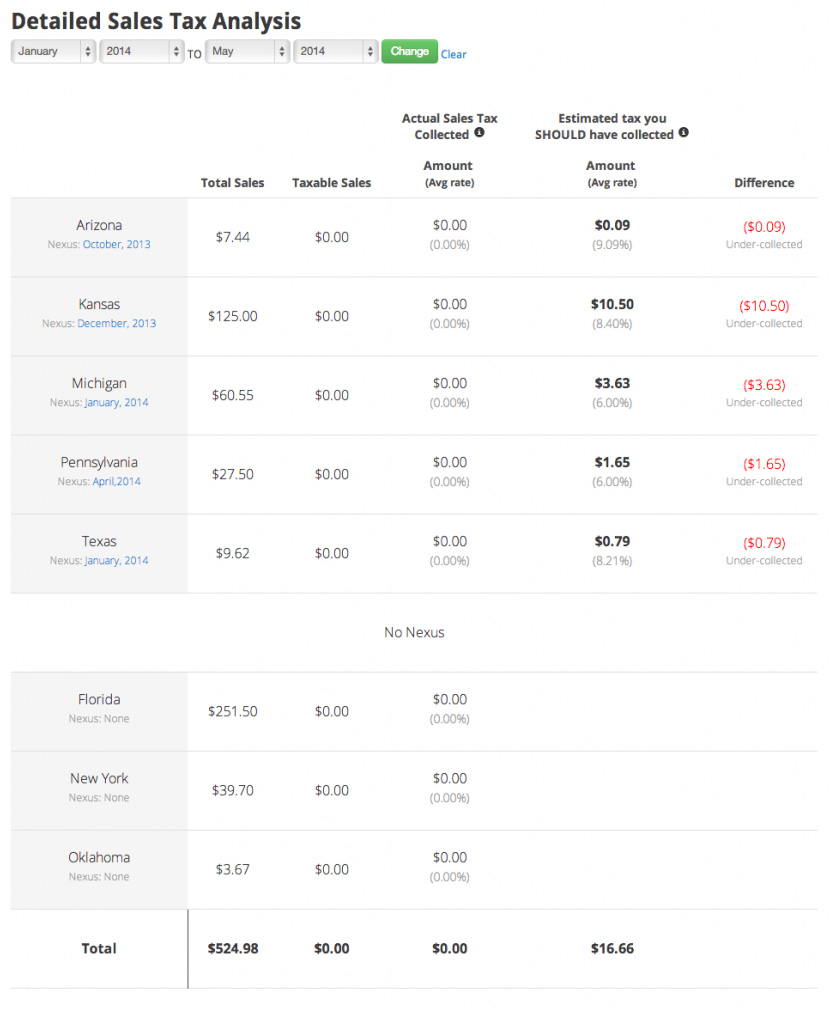
If you’re concerned that you haven’t collected the right amount of sales tax from buyers, TaxJar has a “Detailed Sales Tax Analysis” report that will help. We’ll search your channels and make sure you collected every penny of sales tax you were supposed to collect.
We also allow you to enter the date you first established sales tax nexus in a state. Users who begin using TaxJar in the middle of a taxable period will appreciate remitting every cent you owe to a state, but not a penny more.
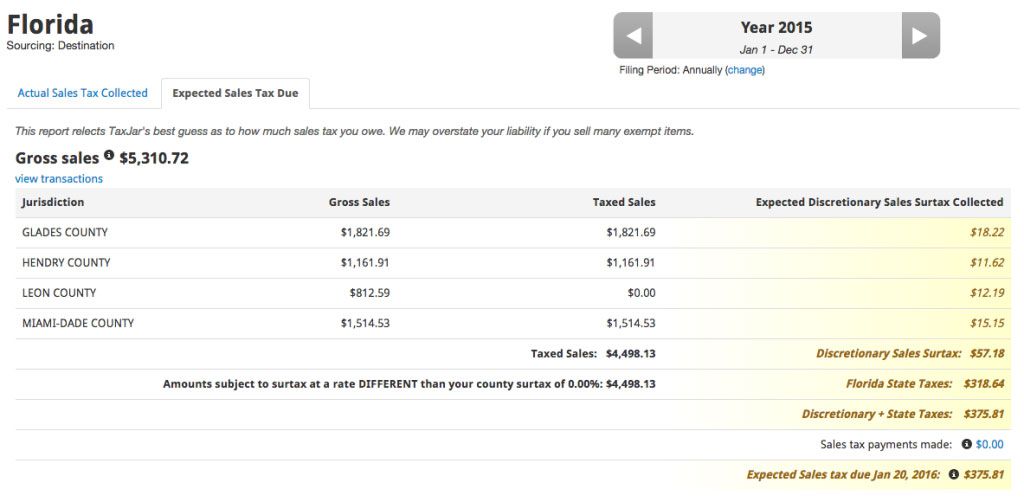
See a problem? You can also click on each state on your TaxJar dashboard and see an “Expected Sales Tax Due” report. This report will show you how much we thought you should have collected in each state and taxing district (city, county, etc.) to help you figure out where the discrepancy lies.
Why is this so important? Sometimes your state can decide to perform a sales tax audit on your business. We’ve heard from many sellers that these audits are more arduous than IRS audits. This is just another reason why it’s so important to get a handle on sales tax early – before the state gets a handle on you!
Remitting Sales Tax to Nexus States
A state’s taxing authority is generally called the “[State] Department of Revenue” though it can go by other names. (For example, California’s taxing authority is the “California Department of Tax and Fee Administration.”)
When you apply for your sales tax permit with your state’s taxing authority, they will assign you a frequency at which to file and remit sales tax. This is generally monthly, quarterly or annually, and often depends on your sales volume or the volume of sales tax you collect
Sales Tax Filing Due Dates
Be warned that while many states set their sales tax due date as the 20th of the month, states can vary wildly in their sales tax due dates. If you are a quarterly payer, be sure you are aware of which date your state considers a “quarterly” due date. Sales tax filing due dates can vary to a surprising degree. You can check sales tax due dates in every state here.
How to File Sales Tax Returns
As with sales tax rules, every state has slightly different requirements for filing sales tax returns. For more details on how to file in each state refer to state sales tax info.
Most states allow you to file and pay online, and some even require it.
Be warned that some states are harsh taskmasters (usually ones that are destination-based for tax collection like Washington), and require you to report how much sales tax you collected in every single sales tax district. Some states have hundreds of sales tax districts, so this can easily turn into a nightmare – especially if you’re filing in multiple states at a time.
TaxJar has you covered here, too. After you connect your eCommerce accounts to TaxJar, we’ll subtotal your sales and sales tax collected by state, and country, city and special tax when it’s required. With TaxJar, you don’t have to deal with spreadsheets or sales tax tables to try and determine how much sales tax you collected from each jurisdiction.

TaxJar makes filing sales tax in destination-based states like Washington dead simple.
Summary of the Basics of Sales Tax for Online Sellers
- Determine where you have sales tax nexus.
- Register for a sales tax permit in each state where you have nexus.
- Set up your channels to collect the correct amount of sales tax from buyers.
- Periodically file sales tax for each state where you have sales tax nexus.
This process can be overwhelming for many online sellers. We built TaxJar to make reporting and filing your sales tax automatic. Sign up for a 30 day trial and stop worrying about sales tax forever.
A Sales Tax Calculation Solution for Amazon Sellers
Every state that Amazon has a warehouse in considers your inventory nexus (a presence sufficient enough that you are required to register your business with the state, collect sales tax, and remit that sales tax collected to the state when they tell you to).
Now that you’ve recognized the need to comply in multiple states, the next step is to correctly setup sales tax collection in Seller Central. And that’s what this guide is all about. The following pages will give you an overview of how to use Tax Settings and, most importantly, apply the correct settings for each of the FBA states.
![]() A Professional Seller Account – *Note: Individual Accounts cannot use the Amazon tax service. At the bottom of this page is information Amazon provides on how to upgrade from an Individual Account to a Pro Account.
A Professional Seller Account – *Note: Individual Accounts cannot use the Amazon tax service. At the bottom of this page is information Amazon provides on how to upgrade from an Individual Account to a Pro Account.
![]() Know the states in which you have nexus. – Here’s a link to a page explaining which states Amazon FBA sellers have nexus in.
Know the states in which you have nexus. – Here’s a link to a page explaining which states Amazon FBA sellers have nexus in.
![]() State registration numbers in each state you want to collect sales tax. – This assumes you have registered your business in each state. Remember that most states consider it to be unlawful to collect sales tax without a license.
State registration numbers in each state you want to collect sales tax. – This assumes you have registered your business in each state. Remember that most states consider it to be unlawful to collect sales tax without a license.
Upgrade to Professional Seller
- Go to your Seller Account.
- Under the Settings heading, click the “Account Info” link.
- On the Seller Account Information page, go to the Selling Plan section and click the “Modify Plan” button.
- On the next page, click the “Upgrade” button.
- Review the information on the next page and click the “Proceed to Upgrade” button to accept the terms and switch your plan.
After clicking the “Proceed to Upgrade” button, you will be returned to your Seller Account Information page and see a message indicating that the upgrade process has begun. Your subscription to the new selling plan will begin immediately, and additional links to Professional seller tools will appear on your Seller Account page. Some billing features may take up to 30 minutes to become effective. Once the upgrade process is completed you will no longer be charged the $0.99 closing fee on your orders. You will instead be charged a monthly subscription fee of $39.99 for your Professional selling plan.
Here are the steps to begin collecting sales tax through Amazon:
-
First, login to TaxJar.
If you don’t have a TaxJar account yet, start here for a 30-day free trial. (No credit card required.)
-
When you login you’ll be asked to link a cart. Click “Connect to Amazon.”

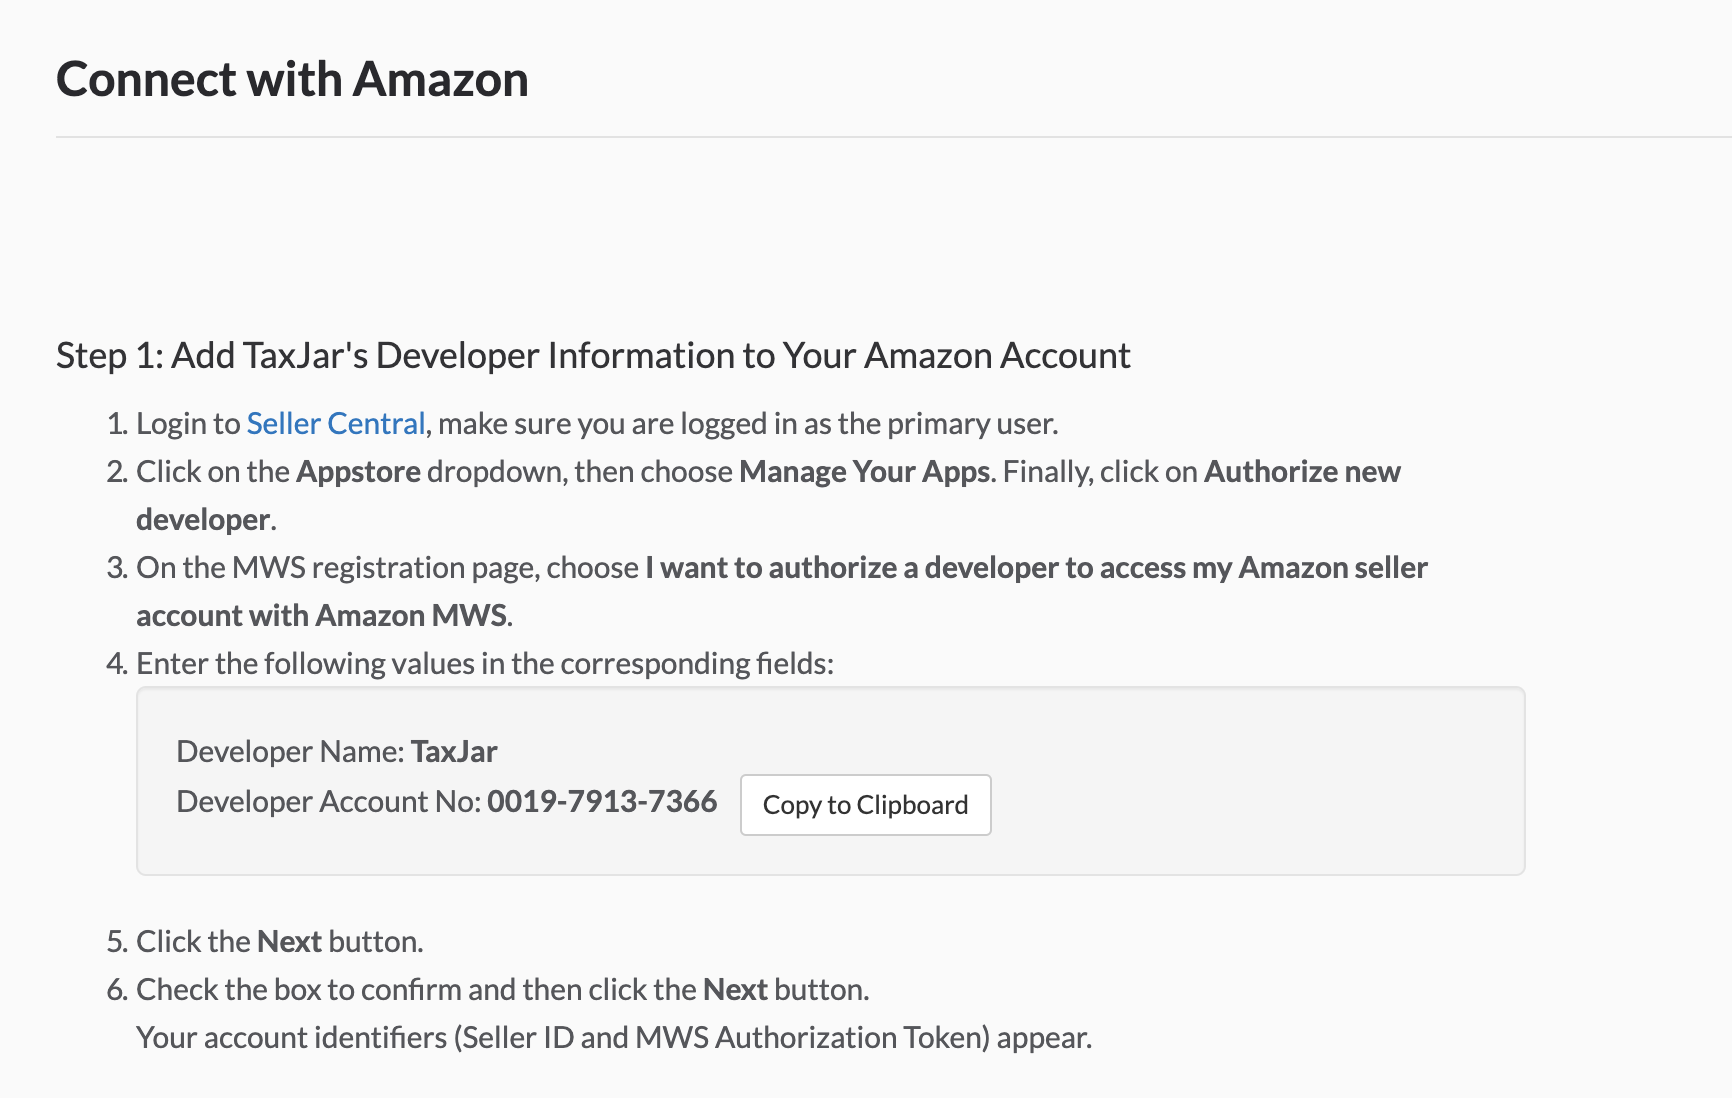
You’ll arrive at a page titled “Connect with Amazon” that looks like this:
-
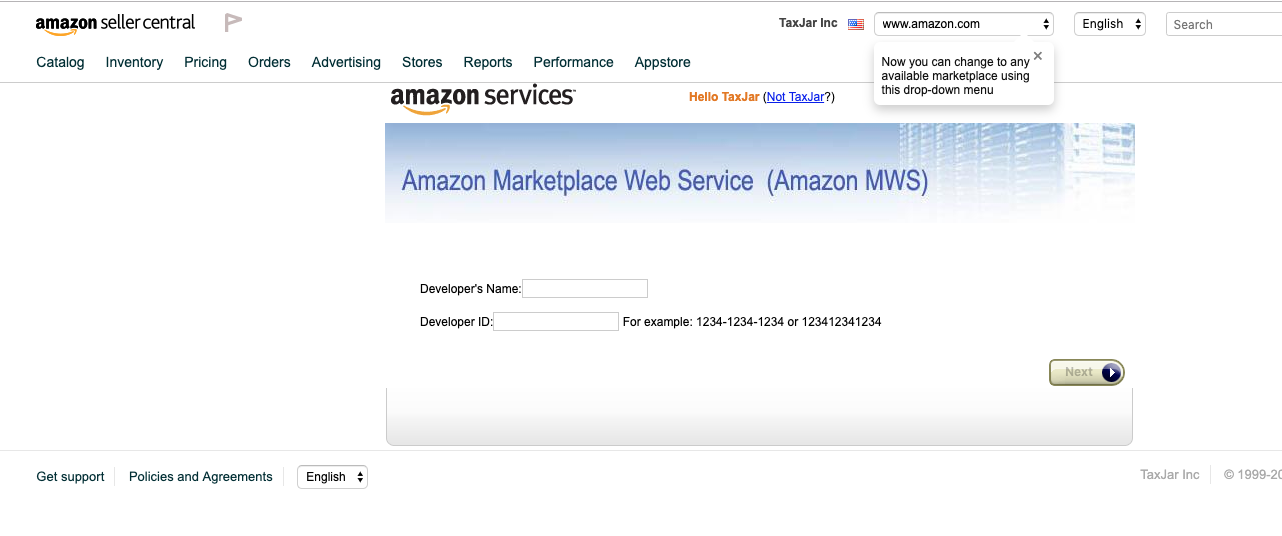
Your next step is to click the link to open the Amazon Marketplace Web Services Page (Link should open in a new window.)
You should end up on a page that looks like this:
 Important: You can only use TaxJar if you are an Amazon Professional Seller. If you are not a Professional Seller, here’s how to become one.
 -
Click the “Authorize New Developer” button. (If you haven’t already, you’ll be asked to sign into your Amazon Professional Seller account here.)

Choose “I want to give a developer access to my Amazon Seller account with MWS.”
-
Amazon will now ask you for the developer’s name and account number. Enter the following:
Developer Name: TaxJarDeveloper Account No: 0019-7913-7366(Important Note: Be sure to copy and paste the Developer Account Number without any spaces!) -
Once you’ve copied and pasted your information, click the “Next” button.
-
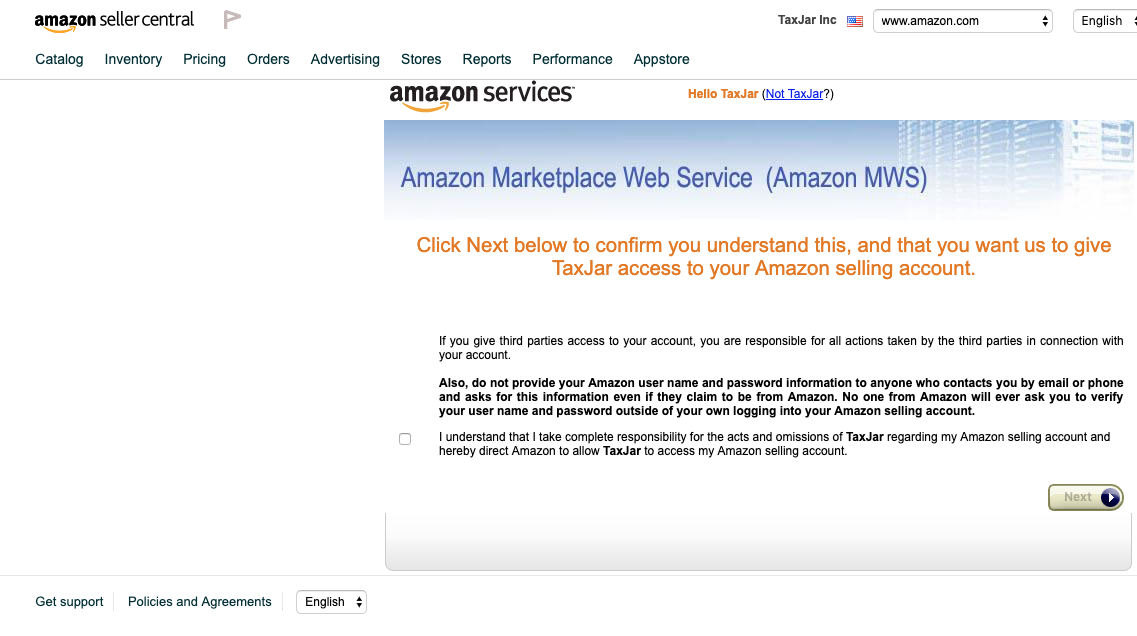
On this page, read over and then accept the License Agreement. Click the “Next” button.
-
You’ll see a “Congratulations” message from Amazon, confirming that you’ve correctly entered the information given to you by TaxJar to access your account.

-
You’re almost done, but there are a couple more very important steps to complete before your TaxJar and Amazon accounts are connected. TaxJar needs you to give us the information from your Amazon web services account by pasting two sets of data into your TaxJar account.
For these last two steps, you’ll need to find your Seller ID and MWS Auth Token on the Amazon web services page.
They should be in boxes like this:

-
Copy and paste your Seller ID back into TaxJar. Be sure to copy just the letters and numbers without any extra spaces.
-
And finally, copy and paste your MWS Auth Token into TaxJar. This is a string of letters and numbers that begins with “amazon.MWS” (without the quotation marks.)
When you have correctly entered both your Seller ID and MWS Auth Token, the boxes in your TaxJar account will turn green to show you are all set!
-
Just hit “Save & Continue” in TaxJar. The next screen will confirm that your Amazon and TaxJar accounts are now connected.

-
Congratulations! You’re all set now. Make sure you review the next step and modify your sales tax settings to ensure that Amazon is collecting the right amount of sales tax on your behalf.
Tax Settings Overview
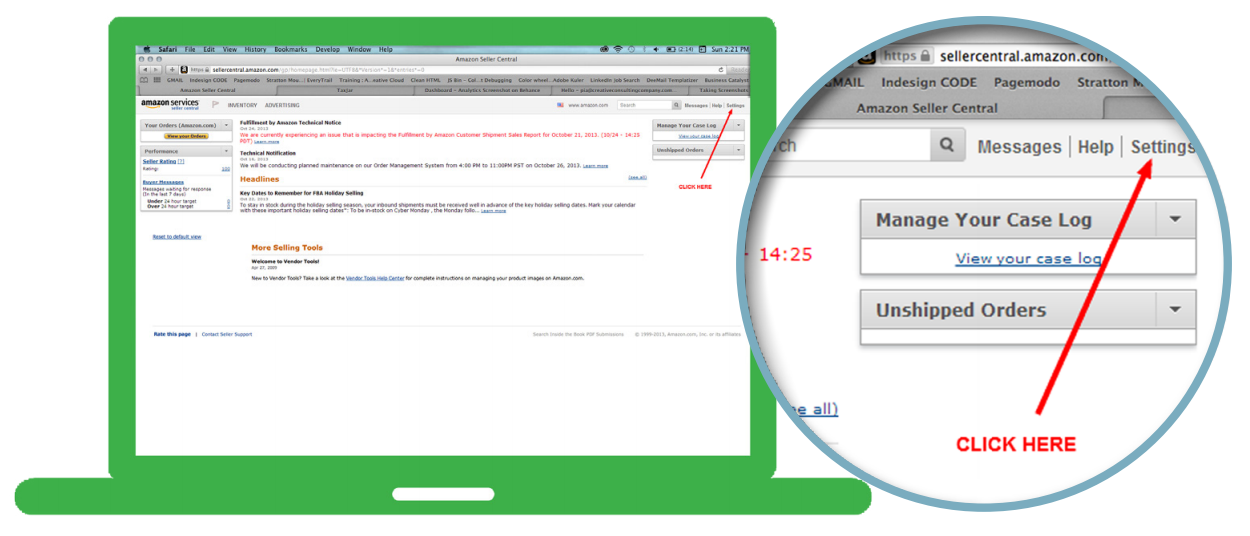
First, go to Seller Central and login to your account.

Next, click on “Settings” and then click “Tax Settings” form the dropdown menu.
The first screen you’ll see in ‘Tax Settings’ should look like the screenshot below.
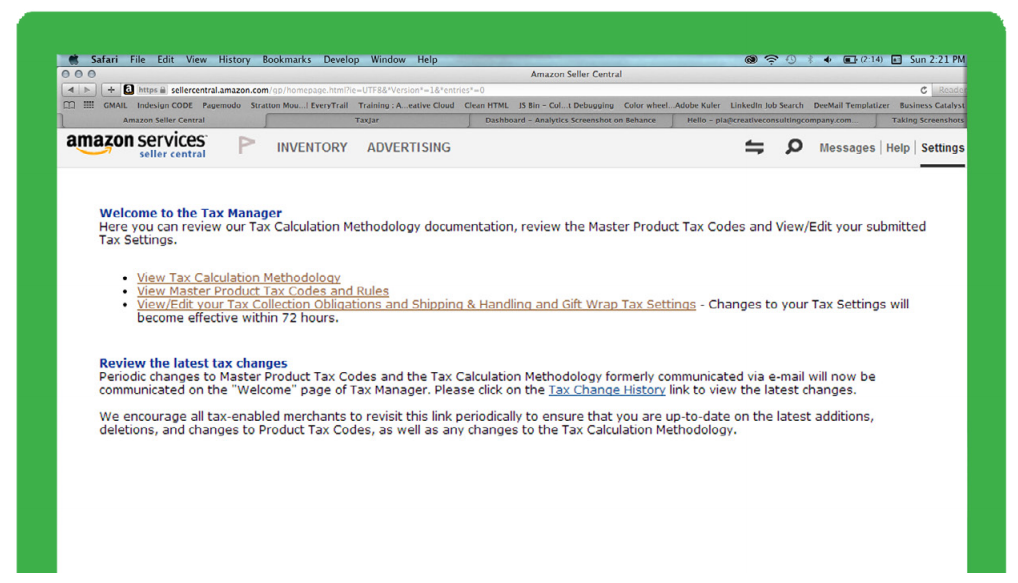
You will notice three clickable options. Below is a simple review of each option.
View Tax Calculation Methodology
This is recommended reading. It explains how Amazon’s tax service actually works. You can’t find this info anywhere else.
View Master Product Tax Codes and Rules
This is really helpful if you have questions about the taxability of the items in your inventory. Amazon provides product tax codes (PTCs) that you can assign to your inventory that helps classify how sales tax should be collected (or not collected if the item is not taxable). Here’s a screenshot of just the top of the list of PTCs.
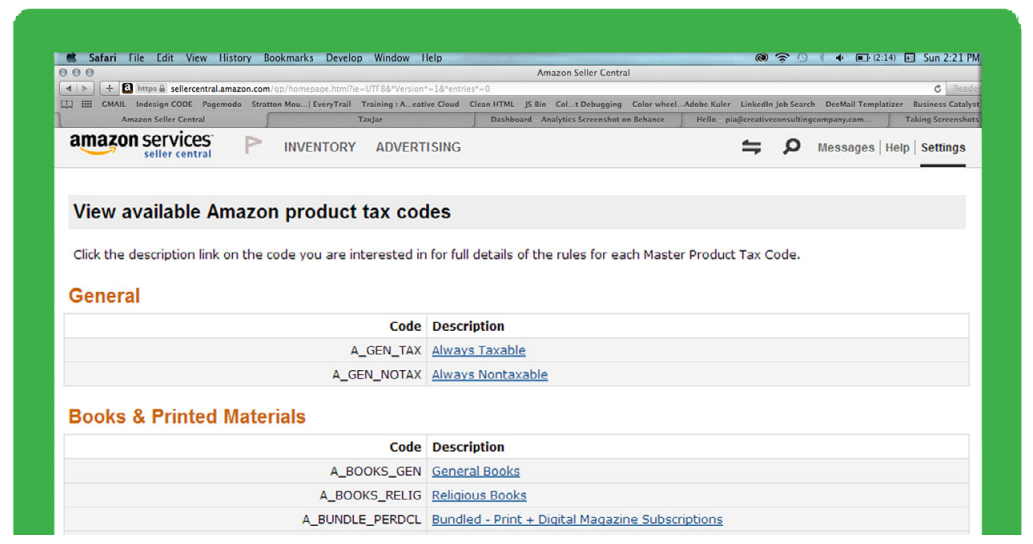
Matching each item you sell to a specific PTC.
As an example let’s take A_BOOKS_GEN:
Here’s what Amazon says about A_BOOKS_GEN:
- What is this code used for? This code is intended to be used for books.
- What kinds of products are typically included? Items typically included within this product tax code include books. A book is defined as a set of printed sheets bound together
- What kinds of products are typically excluded? Items typically excluded from this tax product code are as follows: Religious Books, Newspapers, Electronic Books
Using the same example, if you sell newspapers on Amazon, the most important thing to get out of the above you shouldn’t be using the A_BOOKS_GEN PTC. You’ll notice there are a bunch of options to help you better classify newspapers.
The other really helpful thing to notice below the description of the tax code is the Product Taxability Rules. This tells you if that PTC is taxable. If it is, you’ll see a “T”. If it’s not taxable, or exempt from sales tax, you’ll see an “E”. Some tax codes may be exempt or taxable until a certain price. That’s also represented in the table.
You’ll notice the Product Taxability Rules give you taxability not only for the state but also for local jurisdictions (County, City, and District). Remember, in certain states the sales tax rate may be a sum of several different taxes. Even though you only see one sales tax rate being charged, that rate could be the state, the county, the city, and even a special district tax all added up into one.
For the most part, if the state considers something to be taxable then the local jurisdictions follow suit. Rarely are there discrepancies between the state and a local tax jurisdiction on the taxability of an item.
View/Edit your Tax Collection and Shipping & Handling and Gift Wrap Tax Obligations Settings
This is where all of the magic happens. For you as an FBA seller, this is the most important section of Tax Settings because this is where you’re telling Amazon when to collect sales tax.
Before getting to the actual decision-making part of the process, let’s go through numbers 1 through 4 at the top of the page in plain English.
1. Choose your Product Tax Codes
Here you can either choose a default PTC (Amazon calls this “seller defined”) for all of your items by checking the box that says Use default Product Tax Code or assign a PTC at what Amazon calls the “offer level” (which means assigning PTCs for individual items). Amazon says, “you can make an offer level PTC assignment through your listings feed or the Add a Product feature in Seller Central.”
Note: Amazon says items that don’t have a either a default PTC or an offer level PTC will result in no sales tax collected.
2. Specify your Tax Collection Obligations (States, Counties, Cities, Districts)
Amazon gives you the option to collect sales tax at the state level all the way down to the local level. You can collect no sales tax, collect for both the state and all of the local jurisdictions, or collect only part of the sales tax required. That’s all up to you the seller to decide.
One important thing that Amazon points out is that in order to use this option you’ll need a valid state registration number. Without that number, this option won’t work.
The biggest question FBA sellers ask is, “What should I collect?”. We’ll cover that shortly.
3. Specify a Custom Rate per State (Optional)
As you can probably tell from the title this means that you can choose to collect sales tax at a flat tax rate for a state instead of using using’s Amazon’s tax settings for a state. If you use a custom rate you are choosing not to use Amazon’s predetermined rates for state and local jurisdictions. Your rate overrides everything.
You should know that using the custom rate means that rate will apply to any item you sell that’s taxable. PTC’s that are by default exempt will still remain exempt.
4. Choose Shipping & Handling and Gift Wrap Tax Settings
Unfortunately for FBA sellers, the states don’t agree if shipping, handling, or gift wrap charges that are separately stated on an invoice are taxable or not. Some states say they are taxable, some say they’re not.
Amazon allows you to decide if you want to tax shipping, handling, and gift wrap charges. The gift wrap portion of this is related to the actual service of gift-wrapping, not the paper that you wrap in item in.
Here’s the way it works: if you choose to tax shipping, handling, or gift wrap then Amazon will charge sales tax at the same rate the item that’s being shipped or handles is being taxed. For example, if the sales tax rate for the item you’re selling is 8.25%, then the sales tax rate for shipping on that item will also be 8.25%. If the item is not taxable, then the shipping, handling, or gift wrap will not be taxed.
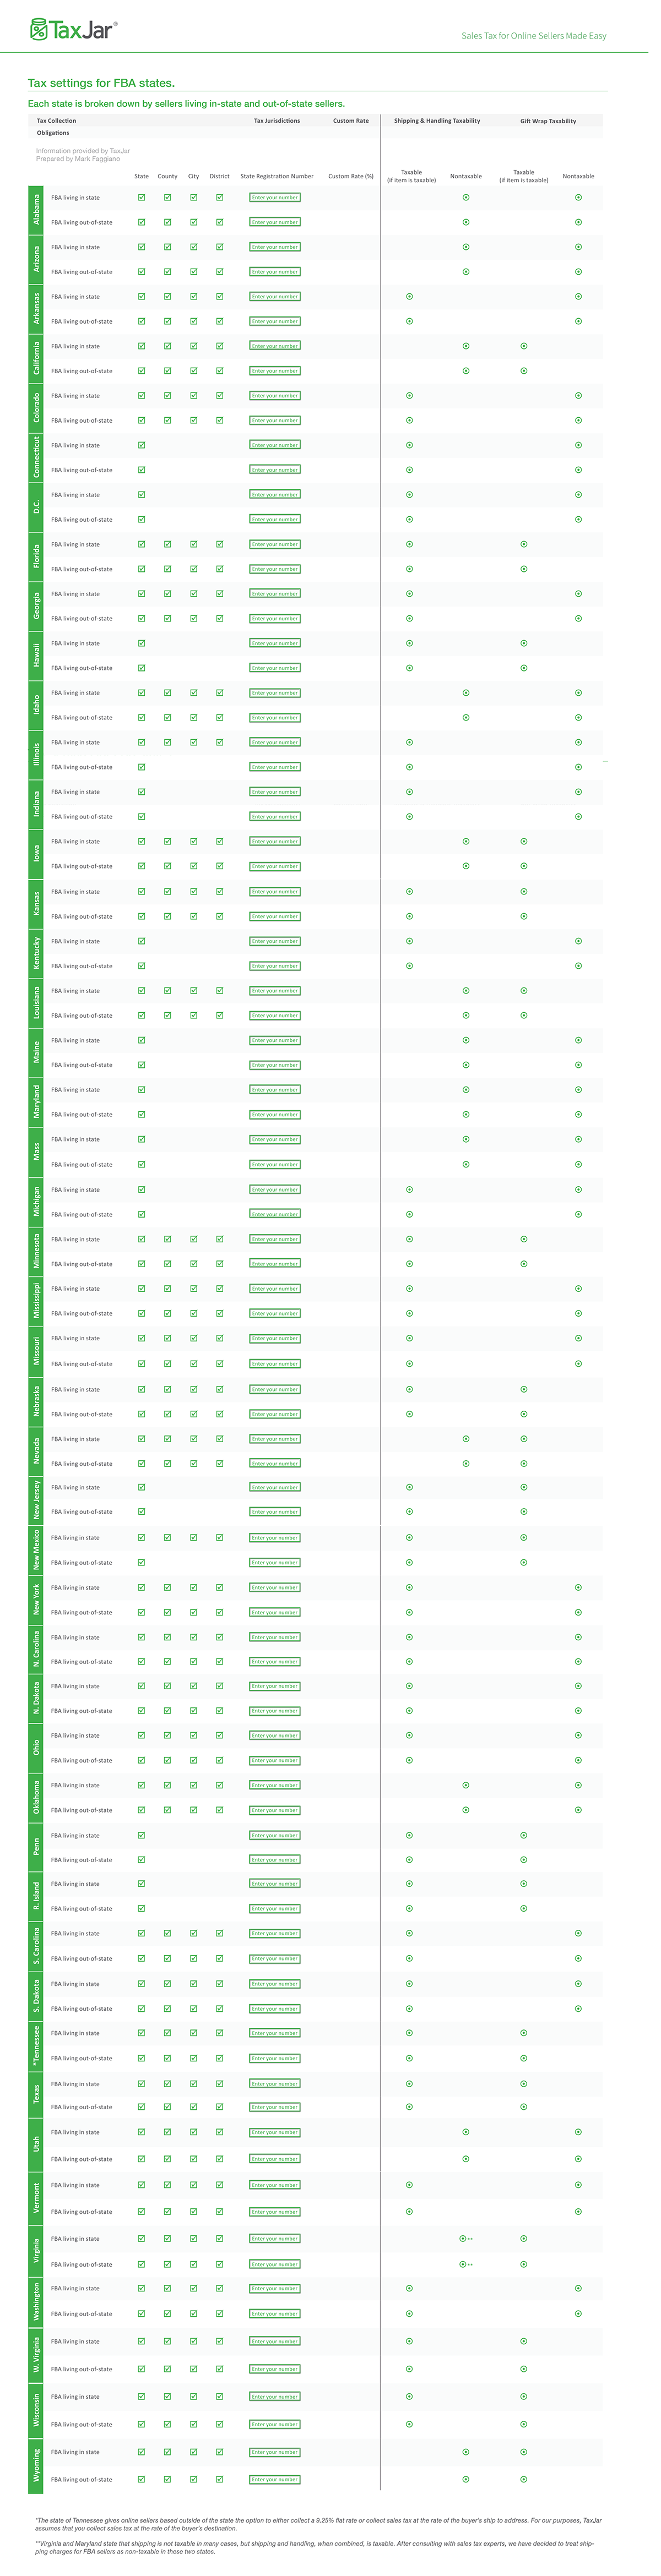
Tax Settings for FBA States
Click the image below to expand to full chart:
Next Steps
For more about TaxJar, to ask us a question, or to find out how to use TaxJar’s sales tax automation for your other online stores, visit TaxJar.com.